Assignment 2 – Road Rage
School of Engineering and Technology, University of Washington Tacoma
TCSS 305 Programming Practicum, Winter 2026
Due Date
Sunday, 8 February 2026, 23:59:59
Description
This assignment builds your understanding of inheritance, polymorphism, interfaces, and abstract classes. You will build a simulator of city streets, traffic lights, and vehicles.
Your task is to write classes that model various vehicles in the city. You'll start by implementing three vehicle classes independently, then discover the duplication and extract common code into an abstract parent class. This "feel the pain first" approach helps you understand why inheritance exists—not just how to use it.
A complete graphical user interface (GUI) is provided—you focus solely on the vehicle logic.
Learning Objectives
By completing this assignment, you will:
- Implement classes that fulfill an interface contract
- Discover code duplication across similar classes
- Extract common code into an abstract parent class (refactoring)
- Design an inheritance hierarchy using abstract classes
- Apply polymorphism to create vehicles with varied behaviors
- Write unit tests for classes with random behavior
- Use encapsulation to protect internal state
Before You Begin
Ensure you have completed:
- JDK 25 installed and configured
- IntelliJ IDEA installed with Checkstyle plugin
- Completed Assignments 1a, 1b, and 1c
Project Setup
This project uses GitHub Classroom to distribute starter code and collect submissions.
Accept the Assignment
GitHub Classroom
- Click the GitHub Classroom assignment link provided by your instructor.
- First time only: Select your name from the course roster to link your UW identity to your GitHub username.
- Click Accept this assignment. GitHub creates a personal repository for you.
- Copy the repository URL from the green Code button.
Clone the Repository in IntelliJ
- Open IntelliJ IDEA.
- File → New → Project from Version Control (or Get from VCS on Welcome screen)
- Paste the repository URL and choose a location.
- Click Clone, then Trust Project when prompted.
Project Structure
The starter code includes a complete GUI, supporting classes, and stubs for three vehicle classes.
TCSS305-a2/
├── src/
│   └── edu/uw/tcss/
│       ├── app/
│       │   └── RoadRageMain.java            (main class - provided)
│       ├── io/
│       │   └── FileLoader.java             (file loading - provided)
│       ├── logic/
│       │   ├── CollisionComparators.java   (collision strategies - provided)
│       │   ├── Direction.java              (enum - provided)
│       │   ├── Light.java                  (enum - provided)
│       │   ├── RoadRage.java               (simulation engine - provided)
│       │   ├── RoadRageEvent.java          (sealed interface - provided)
│       │   └── Terrain.java                (enum - provided)
│       ├── model/
│       │   ├── Vehicle.java                (interface - provided)
│       │   ├── Truck.java                  (stub - implement this first)
│       │   ├── Car.java                    (stub - implement this second)
│       │   ├── Bicycle.java                (stub - implement this third)
│       │   ├── AbstractVehicle.java        (create this - extract common code)
│       │   ├── Taxi.java                   (create from scratch)
│       │   ├── Atv.java                    (create from scratch)
│       │   └── Human.java                  (create from scratch)
│       └── view/                           (GUI - provided, do not modify)
├── test/
│   └── edu/uw/tcss/model/
│       ├── TruckTest.java                  (partial - complete this)
│       ├── CarTest.java                    (partial - complete this)
│       ├── BicycleTest.java                (partial - complete this)
│       ├── TaxiTest.java                   (create this)
│       ├── AtvTest.java                    (create this)
│       └── HumanTest.java                  (create this)
├── icons/                                  (vehicle sprites - provided)
├── maps/                                   (map files - provided)
│   └── city_map1.txt                       (default map)
├── config/                                 (configuration files)
│   └── vehicles.txt                        (vehicle configuration - see below)
├── executive-summary.md                    (document your submission)
└── README.md                               (project readme - provided)
Vehicle Configuration (config/vehicles.txt)
The GUI loads vehicles from config/vehicles.txt. This file controls which vehicles appear in the simulation:
# Phase 1: Implement these first (stubs provided)
Truck
Car
Bicycle

# Phase 2: Add these after creating AbstractVehicle
#Taxi
#Atv
#Human
Lines starting with # are comments (ignored). As you implement each vehicle:
- Start with Truck, Car, and Bicycle (already uncommented)
- After creating AbstractVehicle and refactoring, uncomment Taxi, Atv, and Human as you implement them
Warning
If you uncomment a vehicle that doesn't exist or has compile errors, the GUI will display an error message with the class name. Check your spelling and package location.
The Vehicle Interface
Every vehicle class must implement the Vehicle interface. The provided stubs already declare implements Vehicle—your job is to implement each method.
Vehicle Interface
The Vehicle interface defines the contract for all vehicles in the simulation.
Returns the direction this vehicle would like to move, given the neighboring terrain. The map keys are Direction values; the map values are Terrain types.
Returns whether this vehicle can pass through the given terrain when lights are in the given state.
Called when this vehicle loses a collision. The vehicle should update its own state (e.g., become disabled). The GUI determines collision winners using mass—you just handle what happens when your vehicle loses.
Returns this vehicle's mass. Heavier vehicles win collisions (by default). Each vehicle type has a specific mass value—see the vehicle descriptions below.
Returns the image filename for the GUI to display. The filename must include the vehicle's current direction for enabled vehicles.
- Enabled:
{classname}_{direction}.png(e.g.,"taxi_north.png","human_west.png") - Disabled:
{classname}_disabled.png(e.g.,"taxi_disabled.png","human_disabled.png")
Returns the number of updates this vehicle stays disabled after a collision.
Returns the direction this vehicle is currently facing.
Returns the x-coordinate of this vehicle.
Returns the y-coordinate of this vehicle.
Returns whether this vehicle is currently enabled (able to move).
Called by the GUI once per update on disabled vehicles. Allows disabled vehicles to track their recovery countdown and become enabled when ready. When becoming enabled again, set direction to a random direction using Direction.random().
Resets this vehicle to its initial state (position and direction from construction).
Sets this vehicle's direction. Called by the GUI controller.
Sets this vehicle's x-coordinate. Called by the GUI controller.
Sets this vehicle's y-coordinate. Called by the GUI controller.
Provided Enumeration Types
The following enums are provided in the logic package:
public enum Direction {
    NORTH, WEST, SOUTH, EAST;

    public static Direction random()    // returns a random direction
    public Direction left()             // returns direction 90° counter-clockwise
    public Direction right()            // returns direction 90° clockwise
    public Direction reverse()          // returns the opposite direction
}

public enum Light { GREEN, YELLOW, RED }

public enum Terrain { GRASS, STREET, LIGHT, WALL, TRAIL, CROSSWALK }
Understanding Enums
New to Java enums or need a refresher? See the Java Enums guide to learn how to use Direction, Light, and Terrain effectively in your vehicle implementations.
The GUI and Provided Packages
The starter code is organized into packages with specific responsibilities:
| Package | Responsibility |
|---|---|
io |
File I/O — loads map files and vehicle configuration |
logic |
Game processing — movement, collisions, traffic light cycling |
view |
Rendering and controls — what you see in the GUI |
You write code in the model package. The other packages interact with your vehicles through the Vehicle interface.
GUI Features
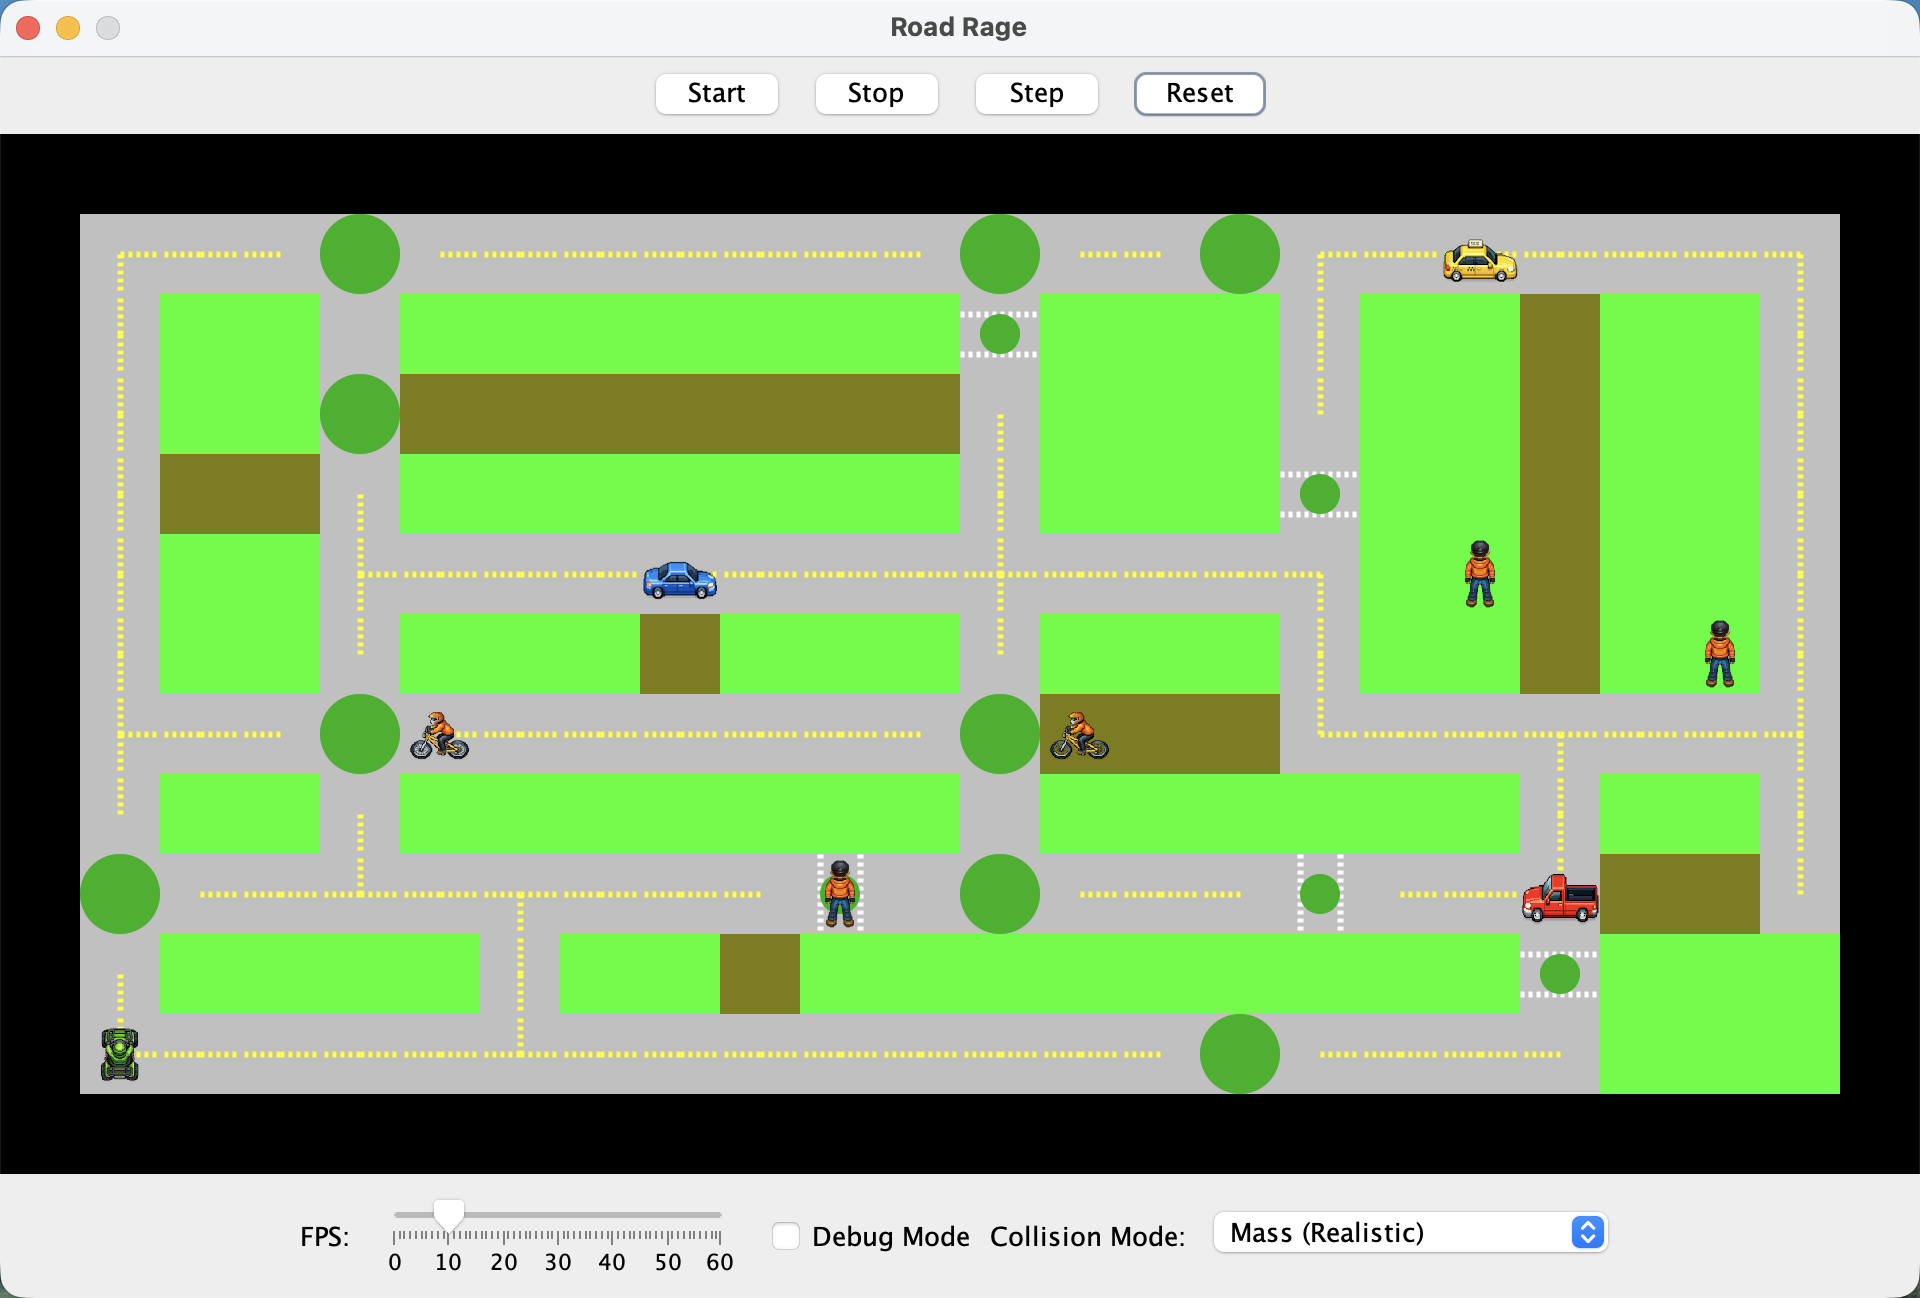
- Controls: Start/Stop animation, Step (single frame), Reset
- Speed Slider: Controls animation rate
- Collision Mode: Dropdown to select collision strategy (Mass is default)
- Debug Mode: Shows (x, y) coordinates and
toString()output for each vehicle
Customizing the Map
Want to test with a different map? Look at io/FileLoader.java — you can change the map filename constant to load a different map file from the maps/ directory. See the Creating Custom Maps guide to learn the map file format and create your own test scenarios.
How the Simulation Works
The logic package runs the simulation. Here's the actual advance() method (simplified):
@Override
public void advance() {
    for (final Vehicle v : myVehicles) {
        final Map<Direction, Terrain> neighbors = generateNeighbors(v);

        // move the vehicle
        if (v.isEnabled()) {
            final Direction newDirection = v.chooseDirection(neighbors);
            v.setDirection(newDirection);

            // move one square in current direction, if it's okay to do so
            if (v.canPass(neighbors.get(newDirection), myLight)) {
                v.setX(v.getX() + newDirection.dx());
                v.setY(v.getY() + newDirection.dy());
            }
        } else {
            // become one move closer to revival
            v.poke();
        }

        // look for collisions
        for (final Vehicle other : myVehicles) {
            if (v == other) { // don't collide with self
                continue;
            }

            if (v.getX() == other.getX() && v.getY() == other.getY()) {
                // resolve collision using the current Comparator
                resolveCollision(v, other);
            }
        }
    }
    // ... system-level steps: advance timestep, change lights, notify observers
}
Note: The actual method includes additional system-level steps (advancing the timestep, cycling traffic lights, notifying observers) that are omitted here since they don't involve your vehicle classes.
What this code does:
- For each vehicle, generate a map of neighboring terrain
- If the vehicle is enabled: choose a direction, set it, then check if the vehicle can pass into that terrain given the current light. If yes, move forward.
- If the vehicle is disabled: call
poke()to count down toward recovery - After moving, check for collisions with other vehicles at the same position (both vehicles must be enabled for a collision to occur)
- Resolve collisions using the selected collision comparator
Two-Step Movement
Movement happens in two steps. First, the vehicle picks a direction based on neighboring terrain, ignoring lights. Then it checks if the light allows entry. A vehicle stopped at a red light waits in place and does not re-route around the light. Pay close attention to Truck rules. It may look like Trucks don't follow this pattern, but they do.
Polymorphism in Action
Notice how the loop iterates over List<Vehicle>. Each vehicle responds differently to chooseDirection() and canPass() based on its type — a Truck behaves differently than a Bicycle, even though both implement Vehicle. This is polymorphism: the same method call produces different behavior depending on the actual object type.
Understanding Polymorphism
Want to understand this concept deeply? See the Polymorphism guide to learn how polymorphism works and why it's essential for extensible code.
Collision Resolution
When two vehicles occupy the same position, a collision occurs. By default, the vehicle with higher mass wins. The losing vehicle's collide() method is called, which should disable it.
The GUI provides a Collision Mode selector (next to Debug Mode) that changes how collisions are resolved:
- Mass (Realistic) — Higher mass wins (default)
- Random (Chaos) — Winner chosen randomly
- Inverted Mass (Underdog) — Lower mass wins
Each vehicle has a mass value (see property tables in requirements). The mass determines collision outcomes:
- Higher mass → wins collisions (in default mode)
- Lower mass → becomes disabled when colliding with a heavier vehicle
- Equal mass → one vehicle chosen randomly (50/50)
The disabled duration determines how many updates a vehicle stays disabled before becoming enabled again. During this time, poke() is called each update to count down the recovery.
Understanding Comparators
Curious how collision modes work? The system uses Comparator to determine winners. See the Comparable and Comparator guide to understand ordering and comparison strategies.
Optional: Exploring the Codebase
Want to see how the starter code uses professional design patterns? The Exploring the Road Rage Codebase guide reveals the Strategy, Factory, Observer, and Sealed Types patterns hidden in the provided code.
Requirements
This assignment is structured to help you discover why inheritance is useful. You'll implement three vehicles independently, notice the duplication, then refactor.
Gen AI & Learning: Why Manual Implementation Matters
AI tools can generate boilerplate code quickly, but understanding inheritance hierarchies requires you to make design decisions: What belongs in the parent class? What's unique to each child? By implementing three classes first and feeling the duplication, you'll build intuition that helps you evaluate AI-generated code later. When AI suggests an inheritance structure, you'll know whether it makes sense.
Requirement 1: Truck
Implement the Truck class by completing the provided stub. The stub already implements Vehicle—you need to add fields, constructor logic, and method implementations.
| Property | Value |
|---|---|
| Constructor | public Truck(int theX, int theY, Direction theDir) |
| Mass | 100 |
| Disabled Duration | 5 |
| Images | truck_{direction}.png (enabled), truck_disabled.png (disabled) |
Constructor Signature Required
The constructor signature (int theX, int theY, Direction theDir) is required. The file loading system depends on this exact signature—do not change it.
Movement behavior:
- Travels only on streets, traffic lights, and crosswalks. All other terrain is impassable.
- Randomly selects straight, left, or right from valid directions
- If all three directions are impassable, reverses
- Drives through all traffic lights without stopping
- Stops for red crosswalk lights; drives through yellow or green crosswalk lights
Implementation Hints
These hints apply to all vehicle classes you implement:
- Don't use a boolean field for enabled/disabled status — can you calculate it from other state?
- For
getImageFileName():getClass().getSimpleName().toLowerCase()returns the class name - Store the initial x, y, and direction so
reset()can restore them
Testing: The starter includes TruckTest.java with partial tests demonstrating how to test random behavior. Study these tests, then complete the test class.
Testing Random Behavior
Testing methods with randomness requires special techniques. See the Testing Complex Logic guide for strategies used in the provided tests.
What tests should cover
- Test
canPass()for each terrain type with each light color - Test
canPass()returnsfalsefor invalid terrain (grass, wall, trail) - Test
chooseDirection()produces all valid options over multiple runs - Test state methods: getters/setters,
isEnabled(),collide(),poke(),reset()
Requirement 2: Car
Implement the Car class by completing the provided stub.

| Property | Value |
|---|---|
| Constructor | public Car(int theX, int theY, Direction theDir) |
| Mass | 50 |
| Disabled Duration | 15 |
| Images | car_{direction}.png (enabled), car_disabled.png (disabled) |
Movement behavior:
- Travels only on streets, traffic lights, and crosswalks. All other terrain is impassable.
- Prefers straight; if impassable, tries left; if impassable, tries right; last resort: reverses
- Stops for red traffic lights (stays still, does not turn to avoid)
- Ignores yellow and green traffic lights
- Stops for red and yellow crosswalk lights; drives through green crosswalk lights
Testing: The starter includes CarTest.java with partial tests demonstrating how to test directional preference and traffic light behavior. Complete the test class.
What tests should cover
- Test
canPass()for each terrain type with each light color - Test
canPass()returnsfalsefor invalid terrain - Test
chooseDirection()follows S → L → R → reverse preference - Test state methods: getters/setters,
isEnabled(),collide(),poke(),reset()
Requirement 3: Bicycle
Implement the Bicycle class by completing the provided stub.
| Property | Value |
|---|---|
| Constructor | public Bicycle(int theX, int theY, Direction theDir) |
| Mass | 20 |
| Disabled Duration | 35 |
| Images | bicycle_{direction}.png (enabled), bicycle_disabled.png (disabled) |
Movement behavior:
- Travels on streets, traffic lights, crosswalks, and trails. All other terrain is impassable.
- Prefers trails. Trail-seeking priority:
- If trail is straight ahead → go straight
- If trail is to the left (but not straight) → turn left
- If trail is to the right (but not straight or left) → turn right
- If no trail in S/L/R directions: prefers straight; if impassable, tries left; if impassable, tries right; last resort: reverses
- Note: Will not reverse just to face a trail behind it — once it leaves a trail, it continues forward
- Stops for yellow and red traffic lights and crosswalk lights
- Ignores green traffic lights and green crosswalk lights
Testing: The starter includes BicycleTest.java with partial tests demonstrating how to test terrain-seeking behavior. Complete the test class.
What tests should cover
- Test
canPass()for each terrain type with each light color - Test
canPass()returnsfalsefor invalid terrain (grass, wall) - Test
chooseDirection()prioritizes trails correctly - Test
chooseDirection()follows S → L → R → reverse when no trails nearby - Test state methods: getters/setters,
isEnabled(),collide(),poke(),reset()
Requirement 4: AbstractVehicle
Stop and look at your Truck, Car, and Bicycle classes. How much code is duplicated? Fields? Constructor logic? Getter/setter implementations? The getImageFileName() method? The reset() method?
Create an AbstractVehicle class that extracts this common code. Then refactor Truck, Car, and Bicycle to extend it.
Requirements:
AbstractVehiclemust be abstract and implementVehicle- Contains all common instance fields shared by vehicle types
- Has a protected constructor that initializes these fields
- All instance fields must be
private - Implements all methods that are identical (or nearly identical) across vehicles
- Child classes implement only
canPass()andchooseDirection()(their unique behavior)
After refactoring:
- Your existing tests should still pass! Inherited methods work the same way.
- Run all your Truck, Car, and Bicycle tests to verify.
What to Extract
Look at your three classes. What's identical? Extract it.
Need more guidance?
Your AbstractVehicle should manage: position (x, y), direction, enabled/disabled status, recovery tracking, and the reset mechanism. Which methods from your three classes handle these?
Detailed checklist (if stuck)
- Fields for x, y, direction, disabled duration, mass, initial state for reset
- Field(s) for tracking enabled/disabled status and recovery countdown
- Constructor initializing common fields
- Getters/setters:
getX(),setX(),getY(),setY(),getDirection(),setDirection(),getMass(),getDisabledDuration() - State methods:
isEnabled(),getDisabledDuration(),collide(),poke(),reset() -
getImageFileName()— hint:getClass().getSimpleName().toLowerCase()gives you the class name
Additional constraints:
- You may NOT add new public or package-level methods to
AbstractVehicle(excepttoString()) - You may add
protectednon-abstract methods if your design calls for them - All instance fields must remain
private— use protected methods to provide access if needed - Do NOT hardcode child class names in AbstractVehicle (e.g., no
if (this instanceof Truck))
Implementation Hints
- Consider using a static
Randomobject shared by all vehicles - An abstract constructor does not have to match the same signature as its concrete children. It can have more, fewer, or different types of parameters.
Design Decision: Should reset() be final?
Consider: What if a child class has additional state that needs resetting? A Taxi might track how long it's waited at a crosswalk. How would that state get reset if the parent's reset() is final?
Your design choice here affects how child classes can (or can't) extend reset behavior. See the Polymorphism guide for patterns on extending vs. replacing parent methods.
About your tests
Your Truck, Car, and Bicycle tests should still pass after refactoring—inherited methods work the same way. In a professional codebase, you might refactor tests to match the new class structure, but that's optional here.
Requirement 5: Taxi
Create a new Taxi class from scratch. You may extend AbstractVehicle directly, or extend another vehicle class if you can reuse significant functionality.

| Property | Value |
|---|---|
| Constructor | public Taxi(int theX, int theY, Direction theDir) |
| Mass | 50 |
| Disabled Duration | 15 |
| Images | taxi_{direction}.png (enabled), taxi_disabled.png (disabled) |
Movement behavior:
- Travels only on streets, traffic lights, and crosswalks. All other terrain is impassable.
- Prefers straight; if impassable, tries left; if impassable, tries right; last resort: reverses
- Stops for red traffic lights (does not turn to avoid)
- Ignores yellow and green traffic lights
- Stops for red crosswalk lights for 3 clock cycles or until the crosswalk light turns green, whichever comes first
- Drives through yellow or green crosswalk lights
Hint: Taxi State and Reset
Taxi needs to track how many cycles it has waited at a red crosswalk. Think about what happens when the simulation resets—how will this counter return to its initial state? If your AbstractVehicle.reset() is final, how can Taxi reset its own fields?
You must test this scenario. Write a test that verifies Taxi's crosswalk wait counter resets correctly when reset() is called.
Testing: Create TaxiTest.java and write tests. Pay special attention to testing the 3-cycle crosswalk waiting behavior.
What tests should cover
- Test
canPass()for each terrain type with each light color - Test the 3-cycle crosswalk wait logic
- Test that
reset()clears the crosswalk wait counter (start waiting, call reset, verify counter is back to 0) - Test
chooseDirection()follows S → L → R → reverse preference - Test inherited methods if not already covered by other tests
Important
After implementing Taxi, uncomment Taxi in config/vehicles.txt to see it in the simulation.
Requirement 6: ATV
Create a new Atv class from scratch. You may extend AbstractVehicle directly, or extend another vehicle class if you can reuse significant functionality.
| Property | Value |
|---|---|
| Constructor | public Atv(int theX, int theY, Direction theDir) |
| Mass | 40 |
| Disabled Duration | 25 |
| Images | atv_{direction}.png (enabled), atv_disabled.png (disabled) |
Movement behavior:
- Travels on any terrain except walls. Walls are impassable.
- Randomly selects straight, left, or right from valid directions
- Ignores all traffic lights and crosswalk lights
- Edge case: If all three directions (S/L/R) are walls, reverses. This is the only situation where ATV reverses.
In Provided Maps
In all provided maps, an ATV should never stop or reverse. These edge cases only occur in custom maps where the ATV is surrounded by walls.
Testing: Create AtvTest.java and write tests. Use the randomness testing patterns you learned from TruckTest.java.
What tests should cover
- Test
canPass()for each terrain type (returnstruefor everything except walls) - Test
chooseDirection()produces all valid options over multiple runs - Test the wall edge case (reverses only when S/L/R are all walls)
- Test inherited methods if not already covered by other tests
Important
After implementing Atv, uncomment Atv in config/vehicles.txt to see it in the simulation.
Requirement 7: Human
Create a new Human class from scratch. You may extend AbstractVehicle directly, or extend another vehicle class if you can reuse significant functionality.
| Property | Value |
|---|---|
| Constructor | public Human(int theX, int theY, Direction theDir) |
| Mass | 10 |
| Disabled Duration | 45 |
| Images | human_{direction}.png (enabled), human_disabled.png (disabled) |
Movement behavior:
- Travels on grass and crosswalks only. All other terrain is impassable.
- Randomly selects straight, left, or right from valid directions
- If all three directions are impassable, reverses
- Crosswalk-seeking: If adjacent to a crosswalk in S/L/R directions, turns to face it. Will NOT reverse just to face a crosswalk behind (prevents back-and-forth oscillation). However, if the only valid terrain is behind, Human reverses as a last resort.
- Waits for green crosswalk lights — will not enter a crosswalk on green
- Crosses through yellow and red crosswalk lights
Testing: Create HumanTest.java and write tests. Use the terrain-seeking patterns you learned from BicycleTest.java.
What tests should cover
- Test
canPass()for each terrain type with each light color - Test
canPass()returnsfalsefor invalid terrain (street, wall, trail, traffic lights) - Test
chooseDirection()seeks crosswalks when adjacent - Test
chooseDirection()produces random valid options otherwise - Test inherited methods if not already covered by other tests
Important
After implementing Human, uncomment Human in config/vehicles.txt to see it in the simulation.
Requirement 8: Executive Summary
Edit executive-summary.md to personalize it for your submission. Remove all placeholder text in square brackets and replace with your own details.
External Resources
Guide Reference
The following guides support this assignment. See the A2 Guides page for when to read each one.
| Guide | Description |
|---|---|
| Java Enums | Understanding Direction, Light, and Terrain enums |
| Polymorphism | How the simulation uses polymorphism — same method call, different behavior |
| Comparable and Comparator | Collision resolution and ordering strategies |
| Testing Complex Logic | Testing random behavior, directional preferences, and terrain-seeking logic |
| Creating Custom Maps | (Reference) Map file format for testing custom configurations |
| Exploring the Road Rage Codebase | (Optional) Deep-dive into design patterns in the starter code |
Submission and Grading
Important
Start early—inheritance design requires careful planning.
Please see the rubric in Canvas for a breakdown of the grade for this assignment.
Git Workflow Required
For this assignment, you must work on a development branch and submit via pull request.
Submitting Your Work
-
Ensure all your work is committed to your
devbranch -
Push your dev branch to GitHub:
In IntelliJ: Click Git → Push, then click Push
Or from the terminal:
-
Create a Pull Request on GitHub:
- Go to your repository on GitHub.com
- Click Pull requests → New pull request
- Set base:
mainand compare:dev - Add a descriptive title and summary of your changes
- Click Create pull request
-
Merge the pull request to main
-
Verify: Visit your repository on GitHub.com and confirm your changes appear on the
mainbranch
Note: You can commit and push multiple times. Only your final state of main at the deadline will be graded.